DevSecOps Course Labs
Automation with Jenkins
Jenkins is probably the most popular automation server around - but popular in terms of being well used rather than being liked. It's been around a long time and one of the main features is its extensibility: it has a plugin framework with over 1800 published plugins which you can use to build any type of application, or integrate with any third-party system. There's a web UI you can use to define jobs, which get stored on the server's filesystem.
The UI and the plugins are one of the main reasons people don't like Jenkins. Plugins are prone to security flaws so they need frequent updates, but they can be fiddly to automate. You tend to find Jenkins servers are maintained long after they should have been decomissioned, because no-one's sure if they'd be able to recreate the exact set of plugins and load all the job definitions from the old server. We'll use Jenkins in a different way, with minimal plugins and job definitions stored in source control.
Reference
-
Using Declarative Jenkins Pipelines - Pluralsight course
-
Using and Managing Jenkins Plugins - Pluralsight course
Running Jenkins
Start by running Jenkins inside a Docker container, along with a local Git server (using Gogs):
docker-compose -f labs/jenkins/infra/docker-compose.yml up -d
This is a custom setup of Jenkins with a few plugins already installed. It's built from this Dockerfile if you want to see how it's automated.
Browse to Jenkins at http://localhost:8080. You may see a page saying "Jenkins is getting ready to work" - it can take a few minutes for a new server to come online. When you see the home page, click the log in link and sign in with these admin credentials:
- username:
courselabs - password:
student
Check out the UI - it's slightly "web 1.0". The left nav takes you to the main options, including the menu to manage Jenkins; the central section will show a list of jobs once you have created some.
Creating a Freestyle Job
We'll create a classic Jenkins job - using the freestyle type where you build up the steps using the web UI:
- click Create a job on the home screen
- call the new job
lab-1 - set the job type to be Freestyle project
- click OK
This creates the new job. There are different sections of the UI which represent typical stages of a build - source code connection details, the build triggers and the build steps.
We'll use this job to run a simple script which prints some text:
- scroll down to the Build section
- click Add build step
- select Execute shell
- paste this into the Command box:
echo "This is build number: $BUILD_NUMBER of job: $JOB_NAME"
- click Save
Jenkins populates a set of environment variables when it runs the job, which are accessible in the job steps. This script prints out the build number - which is an incrementing count of the number of times the job has run - and the job name.
Now you're in the main job window. The left nav lets you configure the job again, and the central section will show the recent runs of the job.
Click Build Now to run the job. When the build finishes check the output in http://localhost:8080/job/lab-1/1/console
📋 Build the job again - how is the output different?
Not sure?
Click Build Now again. When the job completes you can see the output at http://localhost:8080/job/lab-1/2/console
The job name is the same, but the number has incremented.
There are other tools installed in this Jenkins server, which you would use in a real pipeline. What happens if you print the version of the Java compiler, the Docker command line or the Kubernetes command line in the script?
📋 Edit the job to print the version numbers of javac, docker and kubectl.
Not sure how?
Click Configure in the job page to edit the job.
You can add a new build step or update the Command box in the existing step to print version numbers:
docker version

javac --version

kubectl version
Click Save.
When you build the updated job, it will fail. Shell commands always return with an exit code, usually 0 means OK and non-zero means the command failed. The Kubernetes CLI errors because it can't connect to a Kubernetes environment. The exit code is non-zero so Jenkins takes that as a failure so the job step fails.
If there were other steps after this one, they wouldn't run because the job exits when a step fails.
This is the old-school way of using Jenkins. Where does the job definition live? How would you migrate it to a new Jenkins server? The better option is to use pipelines, which use plugins that are already installed on this server.
Pipelines and the Blue Ocean UI
The pipeline feature comes with the workflow-aggregator and blueocean plugins. Those give you the new way of defining and managing jobs, where the job definition is stored in source control.
Browse to the Jenkins homepage and select Open Blue Ocean from the left nav. You'll see your original build job - click to open it in the new UI, where you can start a new build and view the logs.
We'll create a new pipeline job instead. Browse back to main Blue Ocean UI at http://localhost:8080/blue and click New pipeline.
📋 Set up the new pipeline to connect to your Git server, running at http://gogs:3000/courselabs/labs.git - it uses the same credentials as Jenkins.
Not sure how?
-
Select Git in the source code list (not GitHub! we're using our own Git server)
-
Set the Repository URL to http://gogs:3000/courselabs/labs.git
-
Set Username to
courselabsand Password tostudent -
Click Create Credential - the login details are stored in Jenkins
-
Click Create Pipeline
-
Click Create Pipeline again :)
The Jenkins container is on the same Docker network as the Gogs container, so it can access it using the DNS name
gogs.
Your new pipeline starts empty. Click the plus icon + in the pipeline visualizer to add a new stage. Call the stage audit. Then click Add step to add a step to the stage:
-
Select Shell Script as the step type
-
Paste this into the script text box:
echo "This is build number: $BUILD_NUMBER of job: $JOB_NAME"

javac --version
The UI may not preserve the line spaces correctly, you can ignore that.
Click Save and then Save & run. Jenkins creates the pipeline definition and uploads it to the Git server. Wait a moment and the build will automatically start. The build should succeed - check the output to see the message.
📋 Browse to your Git repo at http://localhost:3000/courselabs/labs - where is the build definition stored?
Not sure?
There's a single file in the repo called Jenkinsfile. Open it and you'll see the pipeline definition, with the stage called audit containing the shell script to print version numbers.
The UI to build a pipeline is useful, but typically you'll create the Jenkinsfile in your source repo and edit the text directly when you change the pipeline.
Storing Pipelines in Source Code
We'll use this Jenkinsfile for our next build. It has multiple stages but it should be fairly clear what it's doing. An interesting point is the Deploy stage which used an input block to ask a user for confirmation.
To run the pipeline, first we'll push the devsecops repo to our local Git server so Jenkins can use it.
Open Gogs at http://localhost:3000 and sign in with username courselabs and password student. Under the My Repositories section you'll see the labs repository; click the plus icon to create a new repo:
-
set Repository Name to
devsecops -
leave all other options with the defaults
-
click Create Repository
Now you can add your local Gogs server as a remote for the course repo, and push the contents:
git remote add gogs http://localhost:3000/courselabs/devsecops.git

git push gogs main
You'll need to log in with your Git client - use the usual credentials.
Check the repo at http://localhost:3000/courselabs/devsecops, and you'll see all the lab content. This is like your own private GitHub.
Browse back to Jenkins at http://localhost:8080/view/all/newJob to create a new job:
-
call it
manual-gate -
select Pipeline as the job type
-
click OK
This is the classic UI - you can still use it to work with new pipelines. Scroll to the Pipeline section:
- select Pipeline script from SCM in the dropdown
- set the SCM to Git
- set the Repository URL to
http://gogs:3000/courselabs/devsecops.git - change the Branch Specifier from
*/mastertorefs/heads/main - set the Script Path to
labs/jenkins/manual-gate/Jenkinsfile
Save and run the build. It will pause after the Test stage and wait for user input.
📋 In the job UI is it clear how you can progress the Deploy stage and complete the build?
Not sure?
You'll see boxes representing each stage of the pipeline - earlier stages are green to show they've suceeded. The Deploy box is blue and it says Paused:
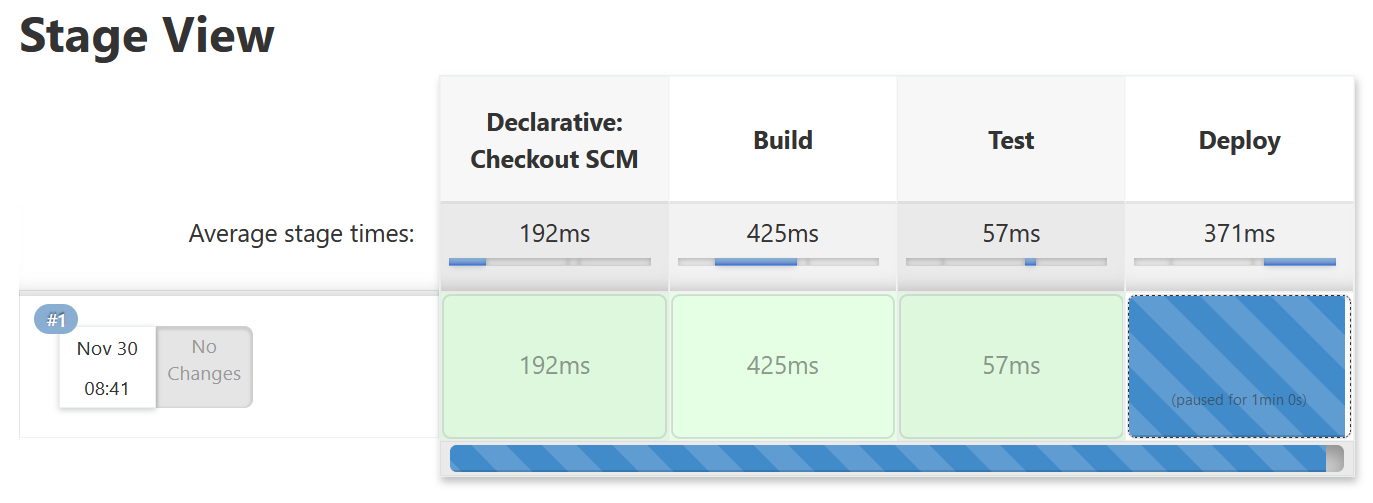
Click the blue box and you'll see the confirmation window with the options defined in the Jenkinsfile. Click Do it! and the build will continue.
Input blocks are very useful as you can automate the full deployment in the pipeline, but still have manual approval for different stages.
Lab
Now it's your turn :) There's another pipeline defined in this repo which builds and runs a simple Java app. The Jenkinsfile is at labs/jenkins/hello-world/Jenkinsfile:
- create a new job to run that pipeline
- include a build trigger to poll SCM for changes every minute
- the build will fail :) You'll need to update the Jenkinsfile and push changes to your Gogs server to fix it
- when you get the build running, where can you find the compiled binaries?
Use these commands to push your updated Jenkinsfile:
git add labs/jenkins/hello-world/Jenkinsfile
git commit -m 'Lab solution'
git push gogs
Cleanup
Cleanup by removing all containers:
docker rm -f $(docker ps -aq)
And remove the Gogs remote:
git remote rm gogs